
Editor's note: I first published today's recipe for hosting a tamalada in 2009. At the time, I rarely took step-by-step photos, so today, I'm resharing the recipe with updated photos and a slightly tweaked recipe of my mom's pork filling for tamales. Also, this post may include affiliate links. As an Amazon Associate, I earn a small amount from qualifying purchases at no additional cost to you.
First things first: Is the singular form of tamales "tamale" or "tamal?" Technically, both are acceptable, depending on where you live. The Spanish singular of tamales is actually tamal, although, tamale is used in the American Southwest and often in American media. Our Southern California family uses the Spanish version.
First things first: Is the singular form of tamales "tamale" or "tamal?" Technically, both are acceptable, depending on where you live. The Spanish singular of tamales is actually tamal, although, tamale is used in the American Southwest and often in American media. Our Southern California family uses the Spanish version.
Ready to reconnect with friends over a fun activity? Here are tips for throwing a successfully productive tamalada.
Almost any Latin market in San Diego County that makes in-house corn tortillas also sells "masa preparada para tamales" (masa ready for tamales), but I have a couple of go-to's when buying prepared masa:
Note that all corn masa spoils quickly. Don't buy it more than one day before your party; keep it refrigerated until ready to use.
You'll need to soak the husks before using them to make them pliable. At least two hours before you're ready to start assembling, boil water, place the husks in a large tub or drinks cooler, then pour in the boiling water. You'll probably need several pots of boiling water to submerge the husks. You can also leave the husks submerged in water overnight so you have one less thing to do the day of your party. Regardless of how you soak them, when you're ready to use them, take a handful over to the sink, and working in batches as needed, rinse the husks under running water, removing any leftover silk. Place into colanders or large bowls upright so the water drains away.
As for drinks, a fruity homemade sangria is always a good choice, but lately, I've been obsessed with iced café de olla (a Mexican spiced coffee) spiked with Kahlúa.


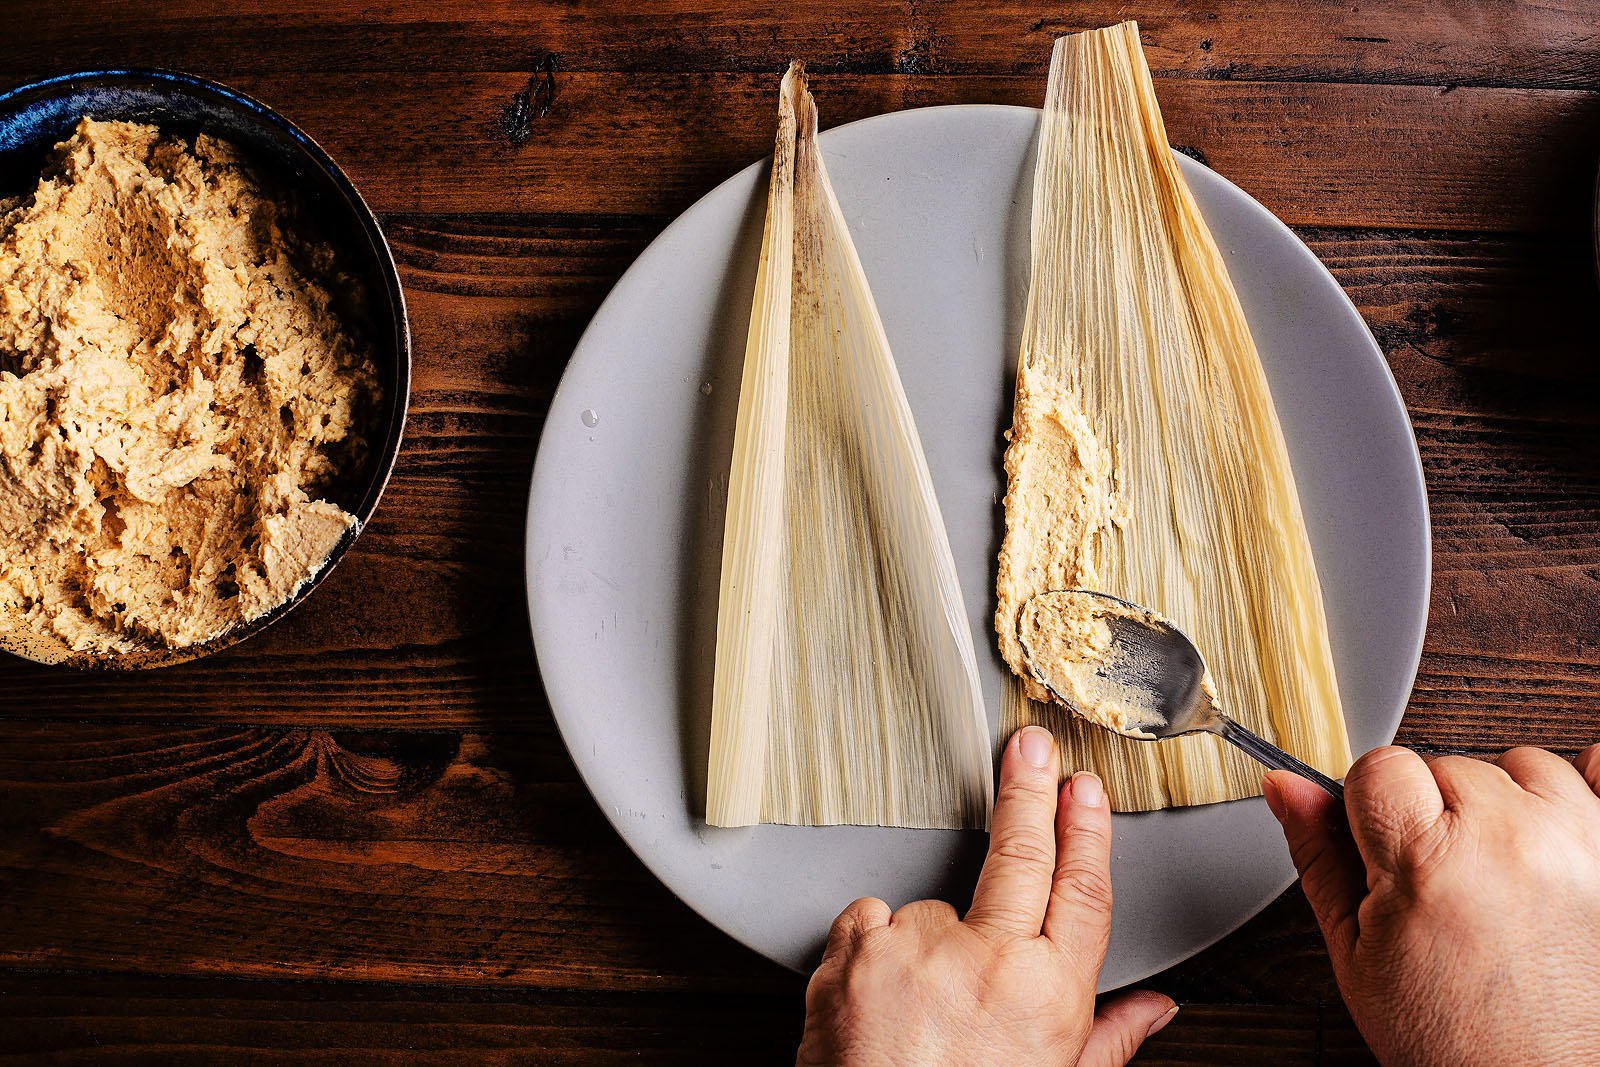
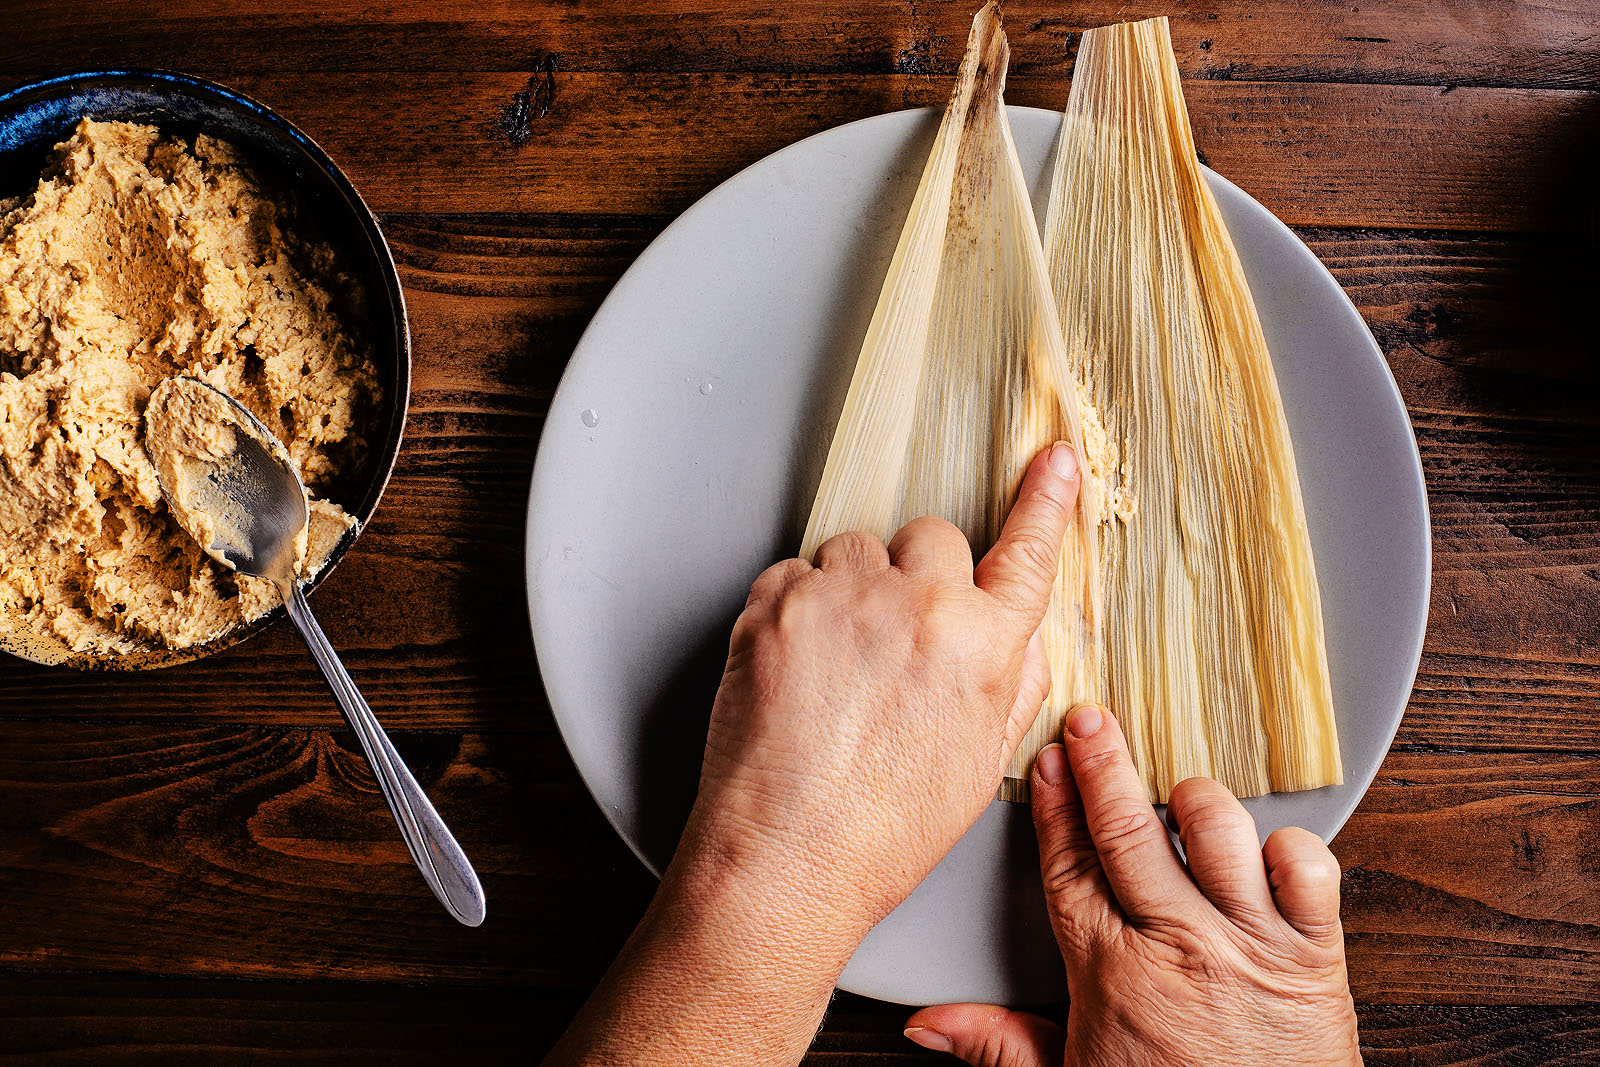
If you have two small husks or a small and a medium, you can paste them together to make them big enough to use.

Smear a teaspoon of masa along the edge of one husk.

Overlap it with the second husk, pressing together firmly.

Add your masa and build as normal.

Avocado, safflower or canola oil
For the seasoning mix:
1 cup flour
3 tablespoons sea salt
2 tablespoons black pepper
3 tablespoons ground cumin
2 tablespoons California chile powder
2 tablespoons New Mexico chile powder
1 tablespoon and 2 teaspoons granulated garlic powder
For the mole:
⅓ cup California chile powder
3 tablespoons New Mexico chile powder
3 quarts chicken broth
2 tablespoons plus 2 teaspoons ground cumin
2 heaping tablespoons granulated garlic powder
1 teaspoon sea salt
1 tablespoon Knorr granulated chicken bouillon
½ disk Ibarra Mexican drinking chocolate
6 heaping tablespoons flour
¾ cup cold water
To assemble:
Don't be shy about asking friends for money
First, depending on how many people are participating and how many tamales you plan on making, you might want to ask everyone to contribute financially or assign them things to bring to help offset your costs. I have generally made all the fillings myself and bought all the tamal-making supplies, including ensuring that there were bags or containers available for everyone to take tamales home. I usually ask for $10 to $20 to help cover those costs (lunch is on me). |
| Try the recipe for these delicious Tamales Empipianados (Tamales with a Red Spiced Sunflower Seed and Pepita Mole) |
Take shortcuts where you can
Keep in mind that the party will be lengthy, and on top of organizing and getting everything set up, you'll also need to provide lunch, drinks and possibly munchies (or consider asking friends to bring the drinks and snacks). The following tips can help lighten the load:Make the meat filling a few days ahead: Working with cold fillings makes assembly easier. If you can delegate to someone interested in cooking it, consider doing so, supplying them with the recipe as early as possible so they have plenty of time to gather ingredients and familiarize themselves with the steps before making it.
Buy the masa (dough) already prepared: Prepared masa is light and airy, a little thicker than whipped cream cheese. If it's dense and breaks off in chunks, you've bought the unprepared version, which is simply nixtamalized corn that has been ground (this is the dough that is used to make corn tortillas). I have steps on how to transform this masa for use for tamales in my post for Tamales Empipianados. However, I strongly suggest buying prepared masa. There's good masa out there; you just have to know where to look.
Almost any Latin market in San Diego County that makes in-house corn tortillas also sells "masa preparada para tamales" (masa ready for tamales), but I have a couple of go-to's when buying prepared masa:
- First is Northgate Market: I've used their tamal masa many times. They also sell plain ground nixtamalized corn, so be sure to read the label carefully or ask for assistance. You want the masa labeled for tamales (masa para tamales or masa preparada). You'll find it in a refrigerated display case near the in-house tortilleria at most Latin markets.
- El Indio in Middletown (India Street): You will need to call 24 hours in advance to order it. They sell red masa (with chile sauce added for flavoring) or white (plain masa), and they come in 5- and 10-pound buckets. Assume you can get about 30 to 35 tamales from each 5-pound bucket and order accordingly. For my tamaladas, where I have three friends helping, I buy 10 pounds and usually get about 60 to 70 tamales, so everyone gets at least 15 to take home with them. Make sure to ask for PREPARED masa when ordering because they also sell the unprepared version.
- Poncho Villa: I have not bought masa here but I have had their in-store made tamales and found the masa pleasing so I'm sure their prepared masa is of the same caliber.
Note that all corn masa spoils quickly. Don't buy it more than one day before your party; keep it refrigerated until ready to use.
 |
| Have a vegan in your family? These Vegan Mushroom Tamales with Green Mole are always a hit with vegans and omnivores. |
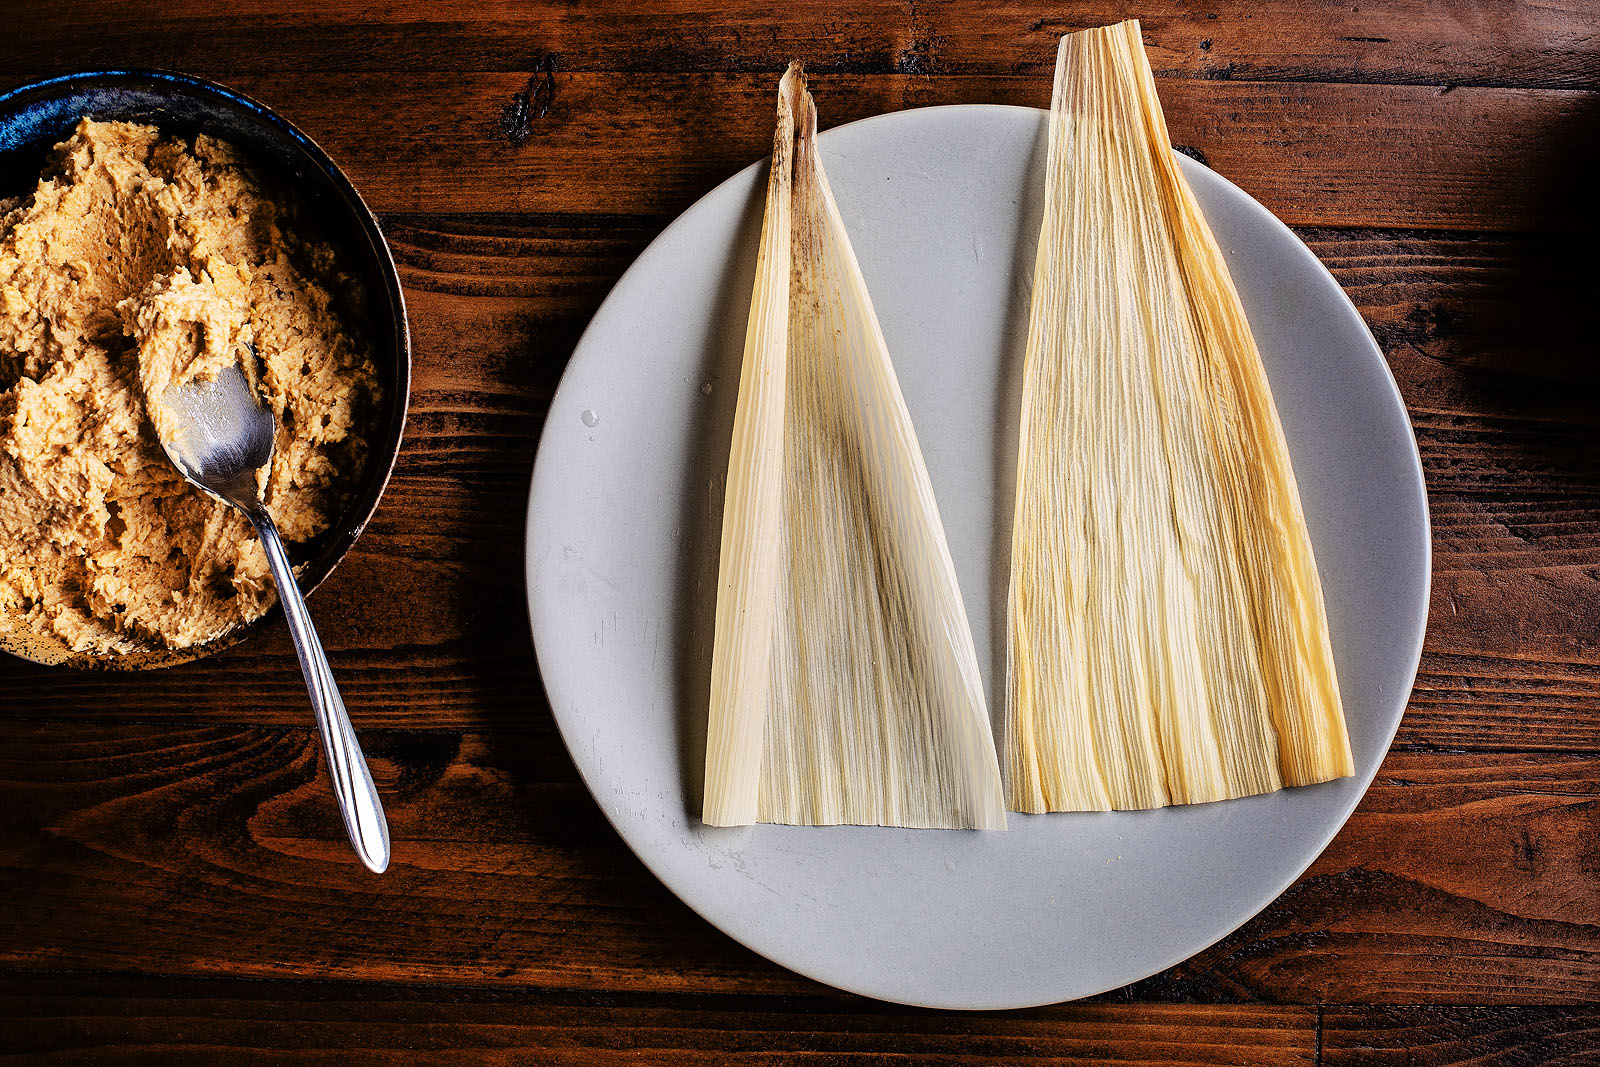
You'll also need to pick up dried corn husks: These come in 1-pound packages. Buy at least two packages because, depending on the brand, you might have more small to medium leaves than beautiful large ones. The small leaves work, but you'll need to patch them together during the assembling process to make them big enough to use. It can be tricky for novices. I use these last (see the section below on "How to patch two corn husks together").
You'll need to soak the husks before using them to make them pliable. At least two hours before you're ready to start assembling, boil water, place the husks in a large tub or drinks cooler, then pour in the boiling water. You'll probably need several pots of boiling water to submerge the husks. You can also leave the husks submerged in water overnight so you have one less thing to do the day of your party. Regardless of how you soak them, when you're ready to use them, take a handful over to the sink, and working in batches as needed, rinse the husks under running water, removing any leftover silk. Place into colanders or large bowls upright so the water drains away.
Time to assemble!
When you're ready to start assembling, place duplicate bowls of masa, fillings and prepared corn husks at both ends of the table so everyone can access what they need to make tamales. Give everyone a sheet tray or lasagna pan to line their assembled tamales on (if you're short on space, place a tray between every two people and have them share it). If you've not made tamales before, make sure to read the how-to included here and demonstrate to your guests how to fill and wrap them so everyone knows what they're doing. |
| This easy recipe for Mom's Red Pozole is what I love to serve for lunch. |
Don't forget about lunch
I like to keep the Mexican theme going by making a big pot of pozole. Make it the day before. Chop and slice all the toppings (except for the avocado; prep that right before serving), place them into reusable containers and store in the fridge until ready to use. A half hour before your guests start to arrive, place the soup over medium-low heat on the stove. When you're ready to eat, pull out the toppings you prepped the night before. I like to include shredded cabbage, finely chopped onions, finely chopped cilantro, and lime wedges. Right before it's time to serve, dice an avocado. For crunch, I also like to include a bowl of chicharrones- they make great soup toppings. Encourage your guest to garnish their bowls of pozole as they like. |
| To drink, try this Iced Mexican Coffee with Kahúla {Café de Olla} |
As for drinks, a fruity homemade sangria is always a good choice, but lately, I've been obsessed with iced café de olla (a Mexican spiced coffee) spiked with Kahlúa.
Some non-alcoholic beverages, like iced tea, iced coffee or lemonade, are also good to have on hand.
To test for doneness, remove a tamal from the pot and let it sit on the counter for 10 minutes. Then unwrap. If the husk pulls away from the masa easily, they're ready. If it sticks, rewrap the tamal and continue steaming for an additional 20 to 30 minutes.
After we've all tasted a tamal or two, I divvy up the rest of the steamed tamales into resealable bags for everyone to take home. I place the assembled raw tamales into big plastic food containers, standing and tightly wrapped with plastic wrap, for my friends to take home and steam. Of course, if everyone wants to stick around and visit while all assembled tamales steam, I'll put a tamalera on each burner. I'm always up for more cocktails and gossip!
Get your steam on
Tamales take about an hour and a half to steam. Depending on the time investment from everyone, I tend to prepare a tamalera – often labeled "Tamale Steamer Pot." These deep 20- to 60-quart stockpots have steamer inserts that sit about 2 inches from the bottom of the pot. They're available at some large chain grocers, Northgate Market, Walmart and online. I'll add a couple of pennies to the pot, water and the steamer insert, then set it on low while everyone starts assembling. Once I have enough tamales to fill the pot, I'll add them, standing, and leave the pot to steam while the assembling continues. Why the pennies, you ask? They will rattle as the water simmers. When they slow down or stop altogether, the water is too low, and you'll need to replenish it (preferably with hot water and not cold tap water).To test for doneness, remove a tamal from the pot and let it sit on the counter for 10 minutes. Then unwrap. If the husk pulls away from the masa easily, they're ready. If it sticks, rewrap the tamal and continue steaming for an additional 20 to 30 minutes.
After we've all tasted a tamal or two, I divvy up the rest of the steamed tamales into resealable bags for everyone to take home. I place the assembled raw tamales into big plastic food containers, standing and tightly wrapped with plastic wrap, for my friends to take home and steam. Of course, if everyone wants to stick around and visit while all assembled tamales steam, I'll put a tamalera on each burner. I'm always up for more cocktails and gossip!
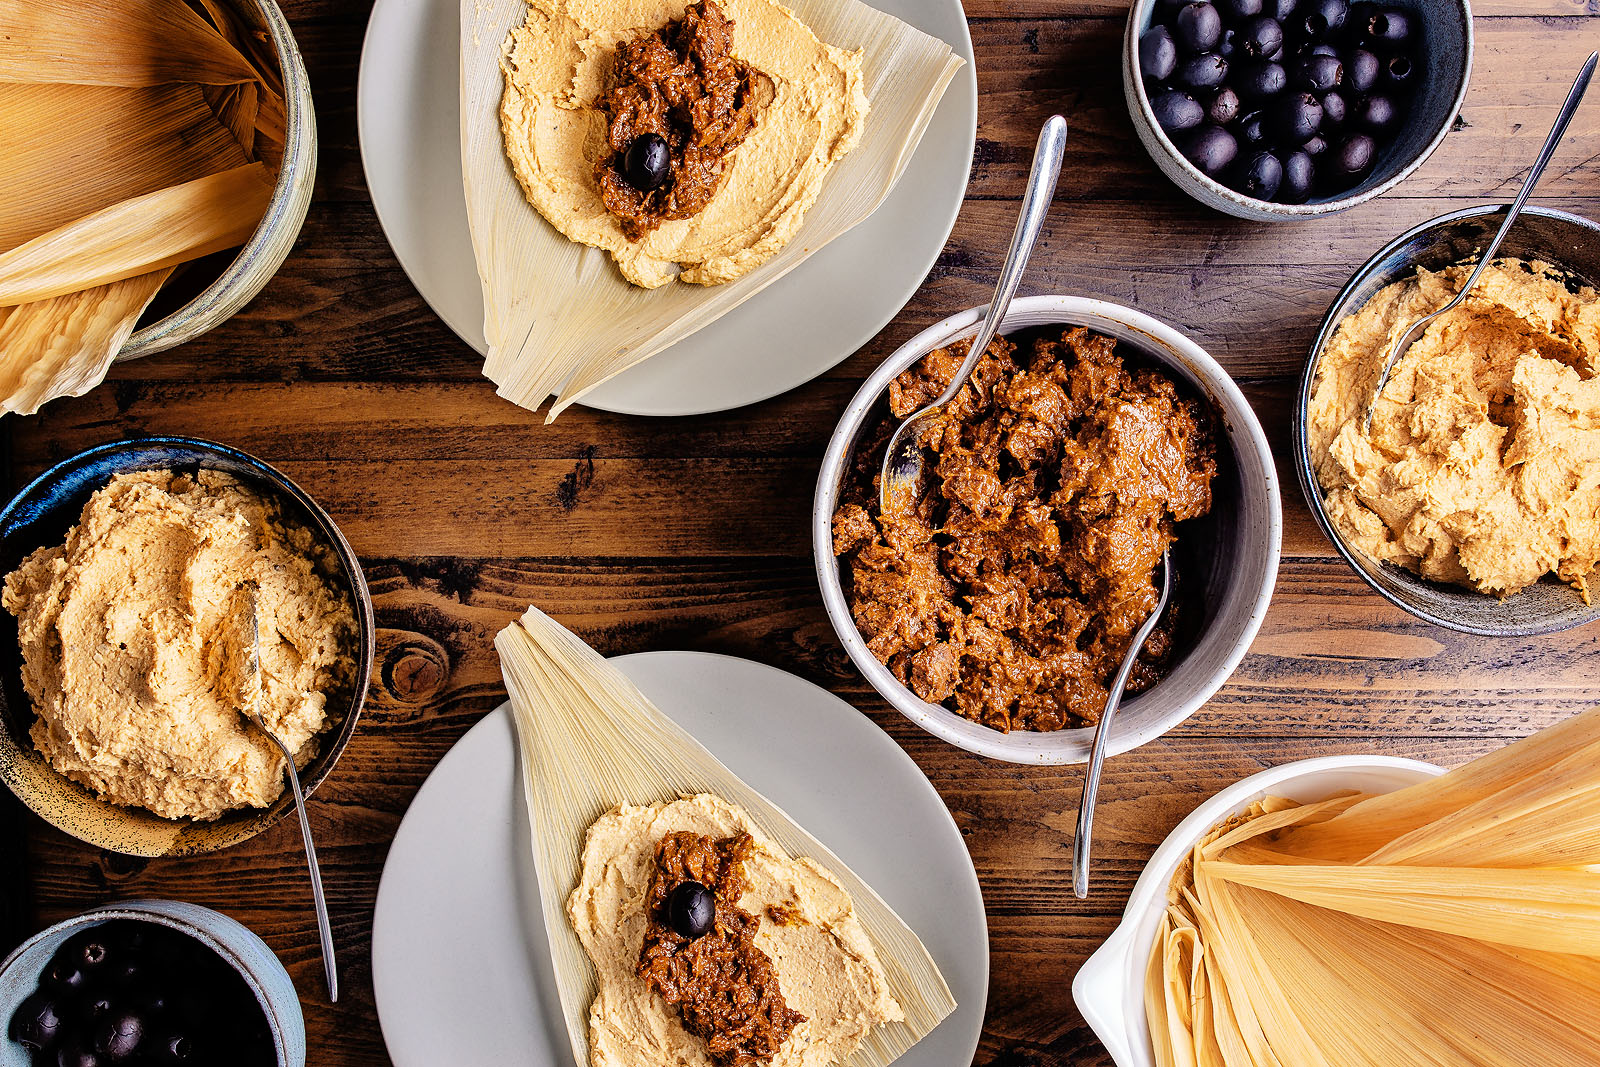
How to assemble a tamal, step-by-step

Lay a corn husk down (smooth side up) with the more narrow, tapered end facing away from you. Add about 2 tablespoons of masa.

Spread the masa on the bottom ⅔ of the husk leaving at least an inch uncovered on the right and left sides and about ½ inch clear on the bottom.

Add 1 or 2 generous tablespoons of your filling.

Add 1 olive and/or other additions (like a small raw baton of potato, carrot or a sliver of jalapeño if you want a bit of heat). I'm keeping it simple here with just an olive.
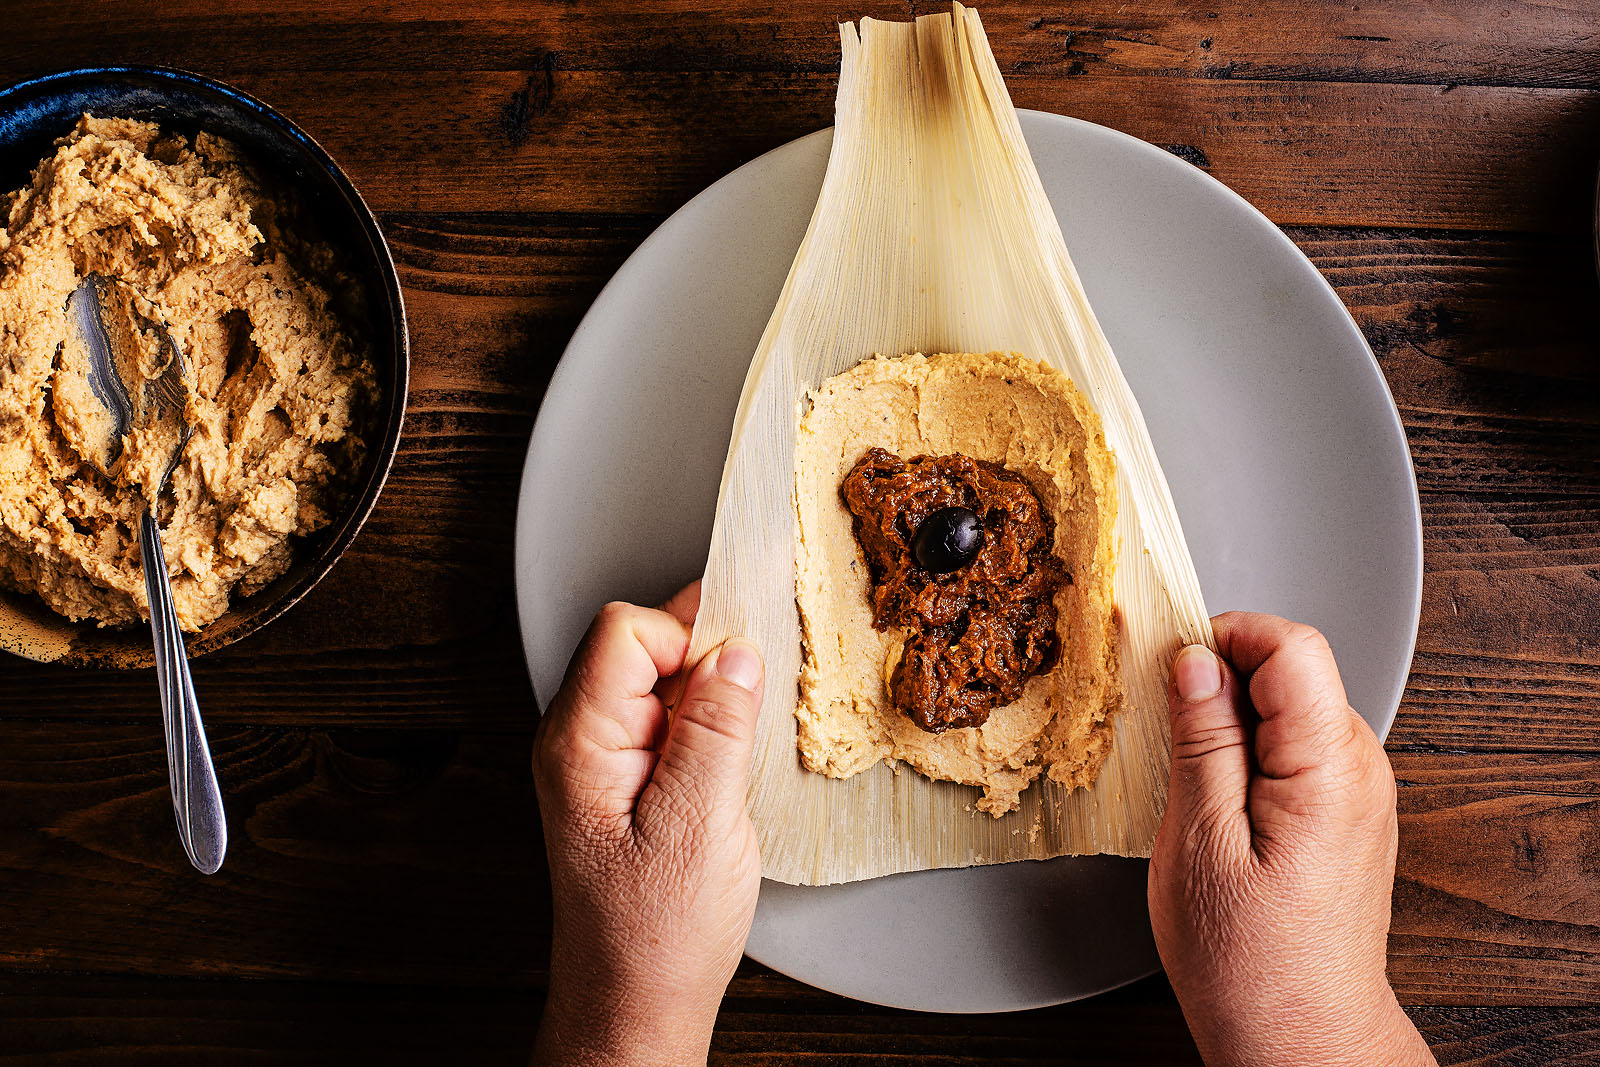
Grasp both sides of the corn husk.

Fold the right side of the husk over, making contact with the masa on the left edge.

Bring the left side over the right, closing the tamal.
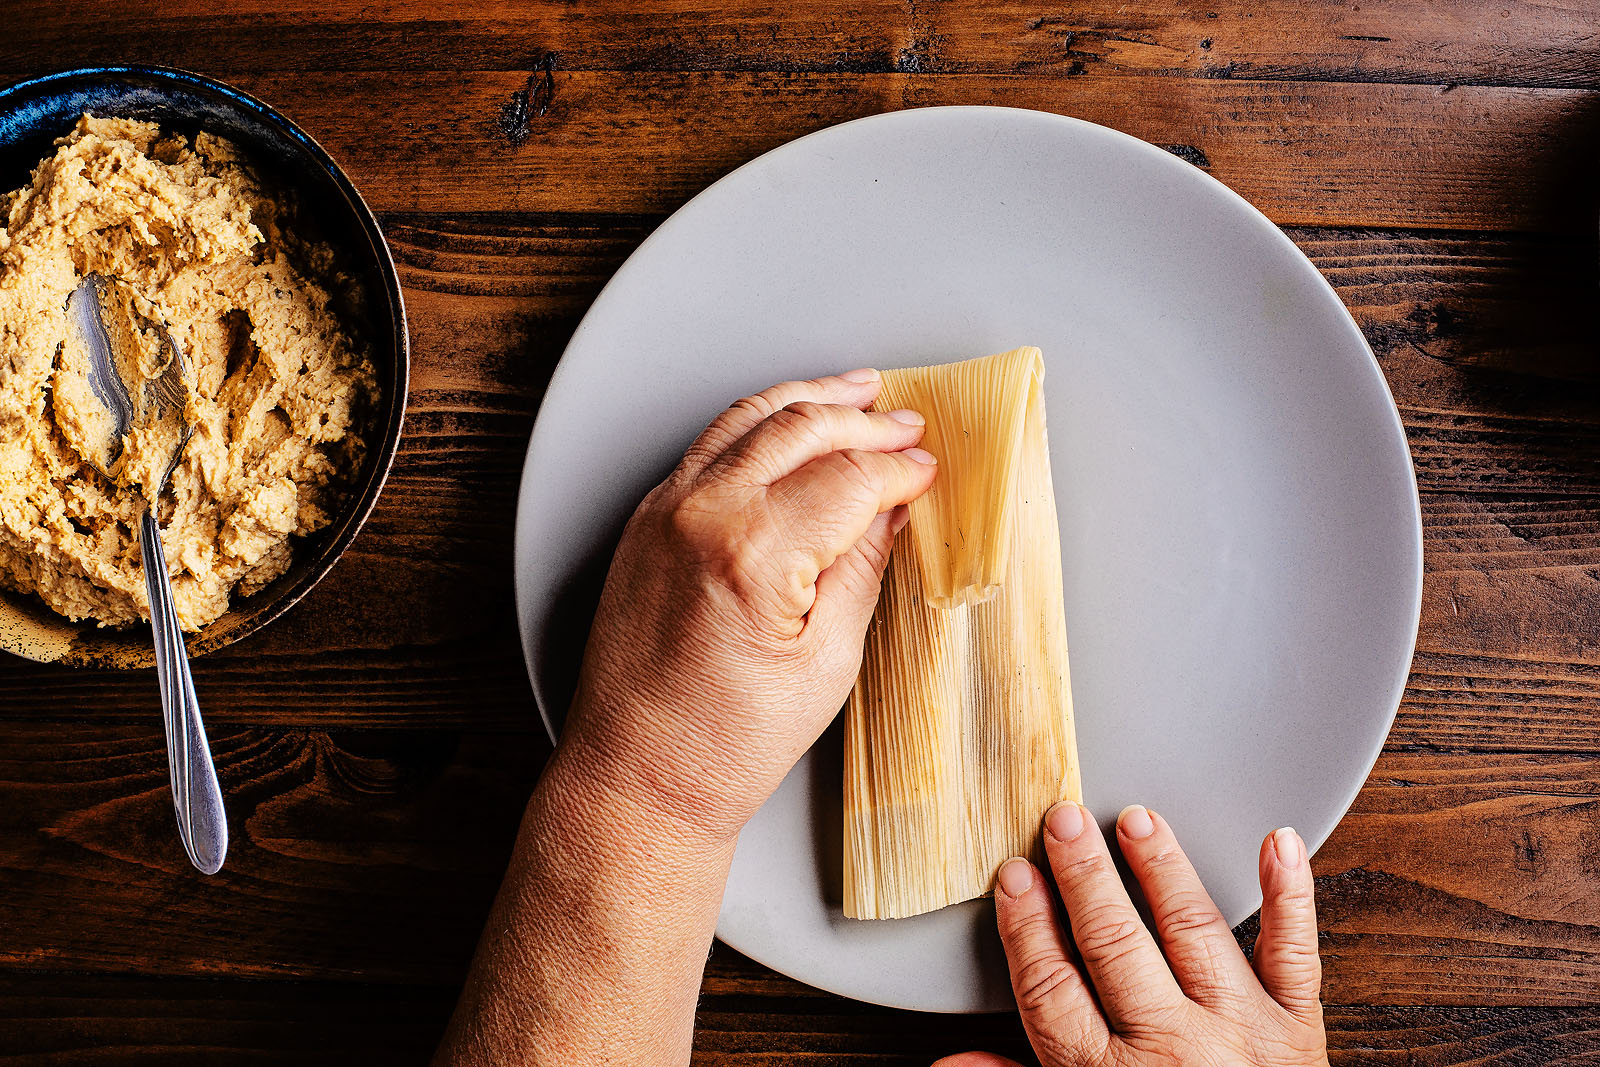
Fold the tapered end of the husk toward you and flip the tamal over.

Your tamal is now ready to set aside until ready to steam. I place them on a large rimmed baking sheet, with the tamal sitting right on the edge so that it's at a slight angle. Butt the next one right up to it, overlapping a bit; continue in this manner to keep the tamales from laying completely flat.
How to patch two corn husks together


Mom's Pork Filling for Tamales
Mom eschewed working with dried red chiles for mole, preferring the ease of commercially ground single-origin chile powders. The mole used to stew the pork for this filling is made with two chile powders: California for depth and color and New Mexico for a bit of heat. Feel free to up the amount of New Mexico if you like a spicier mole. This recipe makes enough for about 70 tamales, making it perfect for a tamalada.
Makes about 5 dozen tamales
Ingredients
7 pounds pork butt, preferably bonelessAvocado, safflower or canola oil
For the seasoning mix:
1 cup flour
3 tablespoons sea salt
2 tablespoons black pepper
3 tablespoons ground cumin
2 tablespoons California chile powder
2 tablespoons New Mexico chile powder
1 tablespoon and 2 teaspoons granulated garlic powder
For the mole:
⅓ cup California chile powder
3 tablespoons New Mexico chile powder
3 quarts chicken broth
2 tablespoons plus 2 teaspoons ground cumin
2 heaping tablespoons granulated garlic powder
1 teaspoon sea salt
1 tablespoon Knorr granulated chicken bouillon
½ disk Ibarra Mexican drinking chocolate
6 heaping tablespoons flour
¾ cup cold water
To assemble:
2 cans pitted black olives, drained
9 to 10 pounds prepared masa for tamales
2 (1-pound each) bags of dried corn husks
Special equipment:
Tamal steamer pot – 20-quart minimum, you need 2 if making this recipe for 70 tamales (buying two of these is less expensive than buying one 40-quart pot)
Directions
Season and brown the meat: Trim off the excess fat from the pork and cut it into ½-inch cubes. Place a large skillet on medium heat. Add oil to cover the bottom of the pan. Toss the ingredients for the seasoning mix into a gallon-size resealable bag and shake to mix well. Add a couple of handfuls of the cubed pork, shaking the bag to coat the pork. Using your hand, scoop up the flour-covered meat, shaking off excess, and place it carefully into the frying pan, keeping the meat in a single layer. Brown the meat on all sides. Transfer it to a paper towel-lined pan or platter as it browns (it'll still be raw; the meat will cook thoroughly in the mole). Continue the process until you've browned all the meat.
Start the mole: While the meat is browning, fill a large stock pot with broth, chile powder, cumin, garlic powder, salt, chicken bouillon and chocolate. Heat to boiling, then cover and simmer on low, whisking occasionally. Before adding meat, taste the mole and adjust the seasoning if needed.
Add the meat and simmer: When you've browned all the meat, carefully add it to the mole. Partially cover and cook for 3 hours on low, stirring occasionally.
Thicken the mole: After 3 hours, whisk the 6 tablespoons of flour into the ¾ cup cold water until well blended. Turn the heat up on the meat. Slowly add the flour mixture when it's boiling, whisking as you add it to avoid lumps. Continue a low simmer while stirring for 10 minutes to give the mole time to thicken.
Cool the mixture: Turn off the heat and allow to cool thoroughly before refrigerating until ready to use or proceed to assembling the tamales so long as the meat mixture is completely cooled.
Assemble the tamales: Place a corn husk, smooth side up, on your work surface with the tapered end of the husk facing away from you. On the bottom ⅔ of the husk, spread 2 generous tablespoons of masa, leaving at least an inch uncovered on the right and left sides. Also, leave ½ inch uncovered at the bottom edge (this prevents the masa from overflowing up and out of the husk during steaming.
Add 1 or 2 generous tablespoons of your filling and an olive. Bring the left and right sides of the husk up toward the middle. Fold the tapered end of the husk toward you and flip the tamal over, placing it on a baking sheet until ready to steam. Set aside until all tamales are assembled.
Steam the tamales: Fill the steamer pot with water up to just below the line where the steamer liner sits. Drop 2 pennies into the pot, then add the steamer insert (the pennies will rattle as the water bubbles and steams; when you can't hear them, it's time to add more hot water to prevent the tamales from burning). Add the tamales to the steamer, standing, with the open end facing up. You can carefully start a second layer, laying them in a concentric circle on top of the first layer if necessary. Cover the tamales with a clean, damp kitchen towel, tucking the ends into the sides, then add a tight-fitting lid. Turn heat to high for 15 minutes, then reduce to medium-low and steam for 90 minutes.
Check for doneness: Carefully remove a tamal from the pot and let stand at room temperature for at least 10 minutes. Carefully open the tamal; if the husk easily pulls away from the tamal, it's ready. Turn off the heat and allow the tamales to rest for 30 minutes before serving. If masa sticks to the husk when you unwrap, re-wrap, and return it to the pot, steam for an additional 20 to 30 minutes. Remove from the pot and allow them to rest, covered with a clean dish towel, for 15 minutes before serving (or leave in the pot with the heat off for at least 30 minutes before serving).
Additional ideas for fillings:
Traditionally, pork tamales are just pork, but our family likes to add a black olive, a potato baton (the size of a french fry) and a thin slice of green bell pepper (the raw veg will cook when you steam the tamales). Also consider any of the following:- Chorizo and potato hash
- Shredded rotisserie chicken mixed with your favorite salsa verde (try my roasted tomatillo salsa)
- Rajas which are strips of veg: potato and carrot sticks, bell pepper or roasted poblano, strips of jalapeño and a stick of Monterey Jack cheese or Oaxaca cheese the same size as the potato stick
- The above rajas with shredded cooked chicken (rotisserie is a great cheat)
- Refried black beans with cheese
Until next time, friends … ¡Buen Provecho!
xo, ani
Comments
Post a Comment